Homemade watercolours
Here I will describe how I made my watercolours, step by step. I used local and natural found mineral and lake pigments.
This was the first time I made my own pigments and watercolours, I do not consider myself an expert at all. At the bottom of this page you will find all of the online resources I used to do this.
Making mineral pigments:
I used rocks, charcoal, ash and charred bone, found locally.
I found the rocks on river beds. A good way to test out if the rock will make a good pigment is by rubbing it on another rock.
To make the charred bone, I placed some pieces of cow bone in a cast-iron pot with a lid, first wrapped in aluminium foil. Cover well and place the pot on the fire and leave it all night.
The next day the bone was black and I was able to get a very dark brown pigment.

For the next steps you need the following tools:
- Safety glasses
- Breathing mask, this is very important
- Hammer
- Mortar and pestle
- Fine strainer or sieve
- Glass containers
- Funnel
- Spoon
- Brush to remove all the pigment from the mortar
· First break the rock into smaller pieces with a hammer
· Grind the pieces down in the mortar and pestle as finely as you can.
· Sift through a fine strainer and store the pigment in a glass container.


Making lake pigments:
Lake pigments are made from organic materials, such as plants, fruit, bark etc
I used beetroot, french marigold, marigold, elderberry leaves and blackberries, found locally.
· Cover with water and leave overnight,
· Boil for one hour.
· Strain and collect the dyed water.
Tools needed for the next part:
- Breathing mask
- Alum or aluminium sulphate
- Sodium carbonate / soda wash
- Glass containers
- Spoons
- Something to mix well
- A scale device
- Coffee filters
- Palette knife
- syringes
- latex gloves
- cloth
Now this for me was the most complicated part.
You will need 10g of alum and 5g of sodium carbonate per 1 litre of dye. Dissolve the same amount of alum to hot water. So for example 5tsp alum in 5tsp water. Use the same ratio with sodium carbonate.
· Heat water. Mix in one container hot water and alum. In another container mix hot water and sodium carbonate. Mix until dissolved.
· Add the alum water to the dyed water and mix well.
· Add the carbonate soda water and make sure you mix well as it will become bubbly and foamy.
· Leave the mixture to rest. You can check in about 1 hour to see if you see any separation. If not then you will have to add more alum or sodium carbonate. A way to check this is by using a ph kit. You should have a neutral ph for the separation to occur. Alum is acid and sodium carbonate is alkaline. I didn’t have a ph kit, I just did it by experimenting. I had to redo the mixture with blackberries twice, so a ph kit would have been very helpful.
· Leave the mixture overnight. You will see a clear separation with sediment at the bottom, as in the photo below.
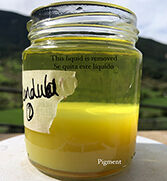 · Remove the clear top liquid with a syringe and discard it.
· Place the leftover pigment mix through a coffee filter. Leave this to rest until all excess liquid had dropped down and you are left with a paste.
· Open the coffee filter and lay on a flat surface, preferably on a cloth(this will get stained). Use a palette knife to spread the paste so it dries evenly.
· Leave this to completely dry, it normally takes a few days.
As I was in a hurry to dry my pigments, I placed the coffee filters in the oven at about 40°C, with the door ajar and a fan blowing towards it. I placed some weights on the sides of the coffee filter so it wouldn’t blow away. It took no more than 2 hours to dry.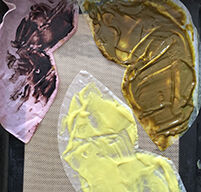
You can also use a dehydrator.
· Once completely dry, collect the pigment and place into the mortar and pestle. Grind finely. Sift through a fine strainer and store the pigment in a glass container. And there you have your lake pigments!
Making homemade watercolours with mineral and lake pigments
Make the Binder
Ingredients:
- 60g ground gum arabic
- 120ml warm distilled water,
- 41g glycerin
- 13.6g honey
- 3 drops of essential oil such as Clove, Thyme or Rosemary - for preservation
I used gum arabic crystals which I first broke down with a hammer and then ground it up with a mortar and pestle to a fine powder. Add to warm distilled water and mix until you see no lumps. Add glycerin, honey and drops of essential oil. Mix well and store in the fridge. The gum arabic will dissolve further overnight.
Tools:
- Glass muller and glass slab
- Palette knives
- Watercolour pans or any other containers
· Place about 1 tbsp of pigment on the glass slab and make a well in the middle. Add about 2 tsp of binder.

· Mix with a palette knife. Add more binder if you need to do so until you have a paste.
· Use the glass muller to grind the pigment and binder mixture in circular motions, spreading it across the glass slab in a thin layer.

 Once well spread out, scrape the paint in the centre with the palette knife. Repeat: mulling and collecting the paint in the centre, until the paint is smooth. You may need to add more binder or distilled water, depending on the pigment.
· How long the paint should be milled depends on the pigment. I did it for about 30 mins each.
· Use a palette knife to scrape the paint into a watercolour container/pan to dry. You can now try out your homemade watercolours!
You can find more photos on my instagram account.

I hope this all makes sense, I did my best explaining all the process. Please do look at all the online resources that I used.
Online resources:
www.youtube.com/watch?v=yYi2JEcp07w
www.youtube.com/watch?v=gL0UguO5U40
www.lostincolours.com/how-to-make-handmade-watercolors/
www.lostincolours.com/foraging-for-pigments-from-local-rocks/
www.druidgarden.wordpress.com/2019/05/12/make-your-own-paints-from-local-rocks-watercolors-oils-and-egg-tempera-from-the-land/
www.jacksonsart.com/blog/2020/09/25/making-handmade-watercolours-with-jacksons-artist-pigments/
Charred bone pigment:
www.youtube.com/watch?v=NuaT2Mmtdm4
www.youtube.com/watch?v=9B_iCh-C3es
Gum arabic binder:
www.youtube.com/watch?v=POeE9XsTmhU
www.isabellearne.com/contact-form-7-id27-titlecontact-form-1-2/
www.youtube.com/watch?v=x_779MFFtF0&t=396s
Lake pigments:
www.rebeccadesnos.com/blogs/journal/making-lake-pigments
www.youtube.com/watch?v=PFUCaYJWoNM
www.youtube.com/watch?v=Fk5bdioAP4o
www.youtube.com/watch?v=NNrgEgeQinE
www.sunsikell.wordpress.com/2011/01/10/how-to-make-a-lake-pigment/
www.youtube.com/watch?v=BqlmghM1CCY
www.thoughtco.com/edible-ph-indicators-color-chart-603655
Making mineral pigments:
I used rocks, charcoal, ash and charred bone, found locally.
I found the rocks on river beds. A good way to test out if the rock will make a good pigment is by rubbing it on another rock.
To make the charred bone, I placed some pieces of cow bone in a cast-iron pot with a lid, first wrapped in aluminium foil. Cover well and place the pot on the fire and leave it all night.
The next day the bone was black and I was able to get a very dark brown pigment.
For the next steps you need the following tools:
- Safety glasses
- Breathing mask, this is very important
- Hammer
- Mortar and pestle
- Fine strainer or sieve
- Glass containers
- Funnel
- Spoon
- Brush to remove all the pigment from the mortar
· First break the rock into smaller pieces with a hammer
· Grind the pieces down in the mortar and pestle as finely as you can.
· Sift through a fine strainer and store the pigment in a glass container.
Making lake pigments:
Lake pigments are made from organic materials, such as plants, fruit, bark etc
I used beetroot, french marigold, marigold, elderberry leaves and blackberries, found locally.
· Cover with water and leave overnight,
· Boil for one hour.
· Strain and collect the dyed water.
Tools needed for the next part:
- Breathing mask
- Alum or aluminium sulphate
- Sodium carbonate / soda wash
- Glass containers
- Spoons
- Something to mix well
- A scale device
- Coffee filters
- Palette knife
- syringes
- latex gloves
- cloth
Now this for me was the most complicated part.
You will need 10g of alum and 5g of sodium carbonate per 1 litre of dye. Dissolve the same amount of alum to hot water. So for example 5tsp alum in 5tsp water. Use the same ratio with sodium carbonate.
· Heat water. Mix in one container hot water and alum. In another container mix hot water and sodium carbonate. Mix until dissolved.
· Add the alum water to the dyed water and mix well.
· Add the carbonate soda water and make sure you mix well as it will become bubbly and foamy.
· Leave the mixture to rest. You can check in about 1 hour to see if you see any separation. If not then you will have to add more alum or sodium carbonate. A way to check this is by using a ph kit. You should have a neutral ph for the separation to occur. Alum is acid and sodium carbonate is alkaline. I didn’t have a ph kit, I just did it by experimenting. I had to redo the mixture with blackberries twice, so a ph kit would have been very helpful.
· Leave the mixture overnight. You will see a clear separation with sediment at the bottom, as in the photo below.
· Place the leftover pigment mix through a coffee filter. Leave this to rest until all excess liquid had dropped down and you are left with a paste.
· Open the coffee filter and lay on a flat surface, preferably on a cloth(this will get stained). Use a palette knife to spread the paste so it dries evenly.
· Leave this to completely dry, it normally takes a few days.
As I was in a hurry to dry my pigments, I placed the coffee filters in the oven at about 40°C, with the door ajar and a fan blowing towards it. I placed some weights on the sides of the coffee filter so it wouldn’t blow away. It took no more than 2 hours to dry.
You can also use a dehydrator.
· Once completely dry, collect the pigment and place into the mortar and pestle. Grind finely. Sift through a fine strainer and store the pigment in a glass container. And there you have your lake pigments!
Making homemade watercolours with mineral and lake pigments
Make the Binder
Ingredients:
- 60g ground gum arabic
- 120ml warm distilled water,
- 41g glycerin
- 13.6g honey
- 3 drops of essential oil such as Clove, Thyme or Rosemary - for preservation
I used gum arabic crystals which I first broke down with a hammer and then ground it up with a mortar and pestle to a fine powder. Add to warm distilled water and mix until you see no lumps. Add glycerin, honey and drops of essential oil. Mix well and store in the fridge. The gum arabic will dissolve further overnight.
Tools:
- Glass muller and glass slab
- Palette knives
- Watercolour pans or any other containers
· Place about 1 tbsp of pigment on the glass slab and make a well in the middle. Add about 2 tsp of binder.
· Mix with a palette knife. Add more binder if you need to do so until you have a paste.
· Use the glass muller to grind the pigment and binder mixture in circular motions, spreading it across the glass slab in a thin layer.
· How long the paint should be milled depends on the pigment. I did it for about 30 mins each.
· Use a palette knife to scrape the paint into a watercolour container/pan to dry. You can now try out your homemade watercolours!
You can find more photos on my instagram account.
I hope this all makes sense, I did my best explaining all the process. Please do look at all the online resources that I used.
Online resources:
www.youtube.com/watch?v=yYi2JEcp07w
www.youtube.com/watch?v=gL0UguO5U40
www.lostincolours.com/how-to-make-handmade-watercolors/
www.lostincolours.com/foraging-for-pigments-from-local-rocks/
www.druidgarden.wordpress.com/2019/05/12/make-your-own-paints-from-local-rocks-watercolors-oils-and-egg-tempera-from-the-land/
www.jacksonsart.com/blog/2020/09/25/making-handmade-watercolours-with-jacksons-artist-pigments/
Charred bone pigment:
www.youtube.com/watch?v=NuaT2Mmtdm4
www.youtube.com/watch?v=9B_iCh-C3es
Gum arabic binder:
www.youtube.com/watch?v=POeE9XsTmhU
www.isabellearne.com/contact-form-7-id27-titlecontact-form-1-2/
www.youtube.com/watch?v=x_779MFFtF0&t=396s
Lake pigments:
www.rebeccadesnos.com/blogs/journal/making-lake-pigments
www.youtube.com/watch?v=PFUCaYJWoNM
www.youtube.com/watch?v=Fk5bdioAP4o
www.youtube.com/watch?v=NNrgEgeQinE
www.sunsikell.wordpress.com/2011/01/10/how-to-make-a-lake-pigment/
www.youtube.com/watch?v=BqlmghM1CCY
www.thoughtco.com/edible-ph-indicators-color-chart-603655